
SSL Mutual Authentication
SSL Certificate Mutual Authentication process means two parties authenticating each other by verifying the details on the digital certificates exchanged between them. This certificate behaves as an identity of the party which is sending request to your application. It is a client-server authentication where a client(web browser/ web application) interacts with server(web browser/ web application) and has a digital certificate issued by trusted Certificate Authority (CA)
Steps followed in Mutual Authentication
- A client sends request to access to a protected resource
- The server sends its certificate to the client.
- The client verifies the server’s certificate.
- If successful, the client sends its certificate to the server.
- The server verifies the client’s credentials.
- If successful, the server grants access to the protected resource requested by the client.
How to achieve Mutual Authentication?
To build this security, both side partners need to follow below steps:
- Create a valid CSR using valid Root CA
- Get it signed from the other party who will be using our services by accessing them
- Import the Signed Certificate received from other party into our backend system into JKS(Java KeyStore)
Creating a new CSR
When you want to create CSR open any platform of bash and run below command:
openssl req -new -newkey rsa:2048 -nodes -keyout TechCruds_key.key -out TechCruds.csr Below image explains the details of this command and what you can modify depending on your requirement:
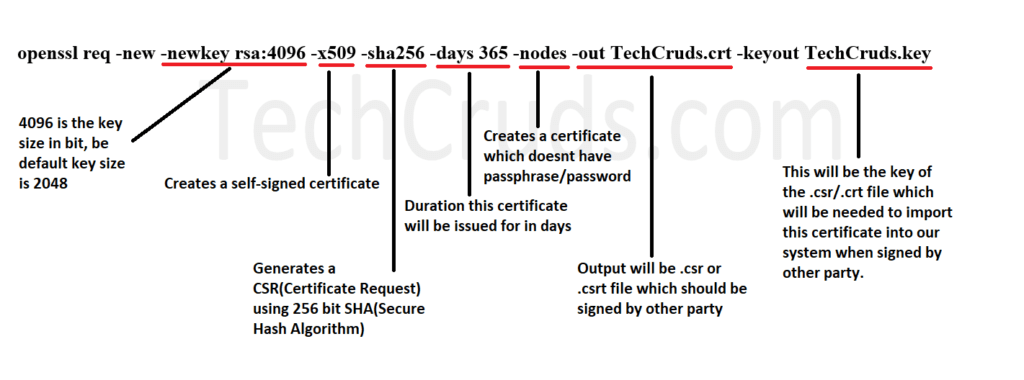
You can modify the above command as per your needs. When your run this command you will need to put few details related to it like: Country, State, Locality, Organization name, Common name and Email address. When the CSR will expire you will be notified on this email address by your CA authority about expiration.
Please see below the example of CSR creation after running the openssl command:
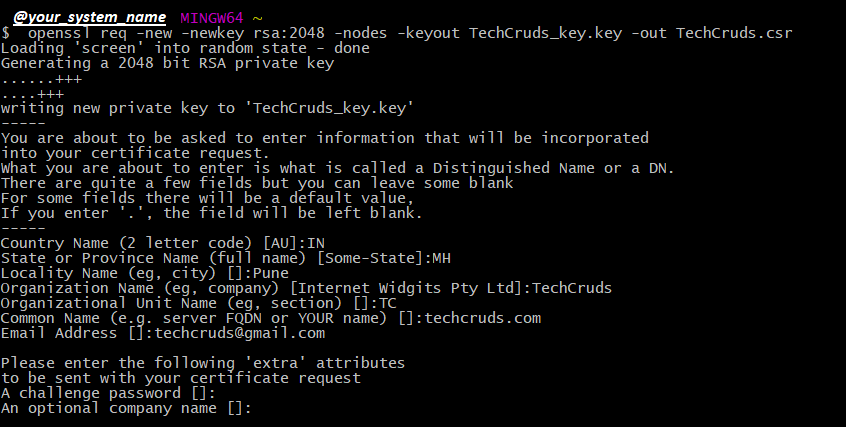
This example will create two files: techCruds.csr and techCruds_key.key. The .CSR will should be sent to other party which they will sign and send you back for importing into your system.
Signing customer’s CSR
To sign the customer CSR, you need to have the certificate and key of the SSL certificate of valid CA like Verisign, DigiCert etc of generic domain like *.TechCruds.com where you can have multiple tenants domains like abc.techcruds.com, xyz.techcruds.com etc.
The below command should be used to sign customer CSR with your SSL certificate and key:
openssl x509 -req -in customerCSR.csr -CA TechCrudsCertificate.pem -Cakey TechCruds_key.pem -out ./signedCSR.pem -set_serial 04 -days 3650Below image explains the details of this command and what you can modify depending on your requirement:

Importing Customer signed certificate
After the customer Signs your certificate and revert with .PEM file, you will need to import this certificate in your system inside a .JKS (Java KeyStore) file. You can learn more about JKS here.
Now, we have two types of certificates to be imported in your system: Public Certificates and Client Certificates
And which one should go where is very confusing thing for many, so to clarify it in simple words see below:
- A Keystore contains private keys, and the certificates with their corresponding public keys.
- A Truststore contains certificates from other parties that you expect to communicate with, or from Certificate Authorities that you trust to identify other parties.
- Installing/Importing Public Certificates:
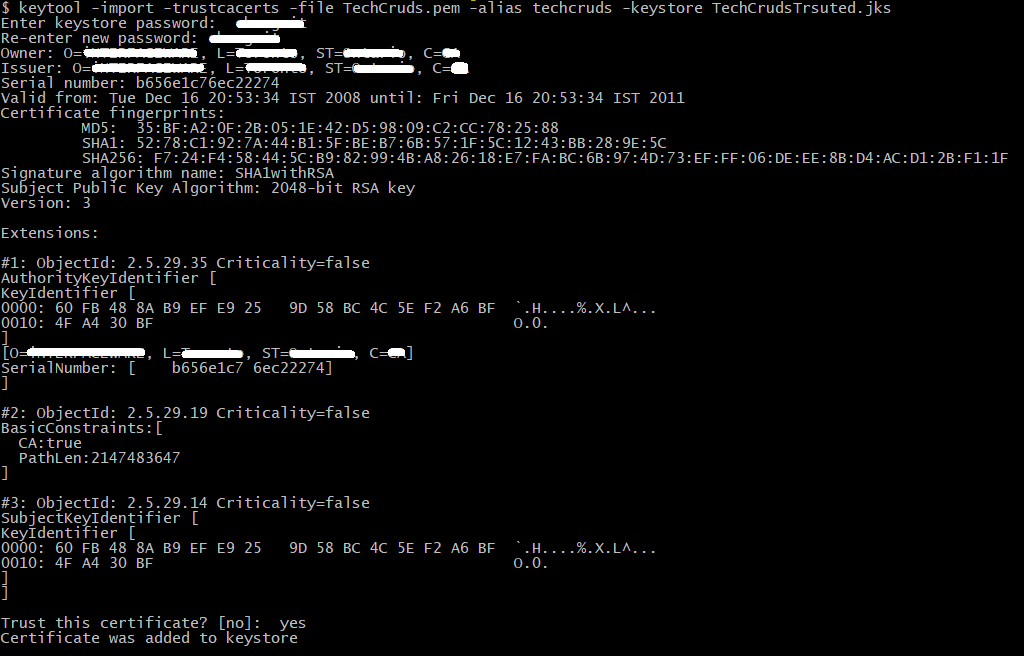
When you get customer’s Public certificate, run below command in your system where u put customer certificate:
keytool -import -trustcacerts -file TechCruds.pem -alias techcruds -keystore TechCrudsTrusted.jks
Where,
| -import -trustcacerts -file | Used to import the customer certificate |
| -alias | Is a nickname given to the imported certificate to identify. You can give it any nickname by which you can identify what is this used for in future. For example, we took it as “techcruds”. |
| -keystore | This will create a JKS file, inside which this certificate will be imported |
After you run the command, you will need to set password which you will also need to put in the configuration file of your system.
2. Installing/Importing Client certificates:
The Signed Client certificate (.PEM file) with the key can create a p12 file. The p12 can be converted to JKS. If there are more than one client certificate then you need to convert each PEM to a p12 file, then merge two p12 files into one and from it create a JKS.
Step 1 – Create .p12 file for each client certificate:
Creating p12 file of Public certificate from Customer1:
openssl pkcs12 -export -in techCurds_cust1.pem -inkey techCruds_key.key -out techCurds_cust1.p12 -name techCurds_cust1Creating p12 file of Public certificate from Customer2:
openssl pkcs12 -export -in techCurds_cust2.pem -inkey techCurds_key.key -out techCurds_cust2.p12Please see below the details about this command:

Step 2 – Merge the 2 .p12 files (This step is needed only in case there are more than 1 client certificate):
keytool -importkeystore -srckeystore techCurds_cust1.p12 -srcstoretype pkcs12 -srcstorepass changeit -destkeystore techCurds_cust2.p12 -deststoretype pkcs12 -deststorepass changeitWhere,
| -srckeystore techCurds_cust1.p12 | It is the source file/one client certificate |
| -srcstoretype pkcs12 | The source type is in pkcs12 format |
| -srcstorepass changeit | Source p12 file password which you had set while creating p12 file |
| destkeystore techCurds_cust2.p12 | The destination file which will include cust1 and cust2 p12 files as a single one with name “techCurds_cust2.p12” |
| -deststoretype pkcs12 | Destination file will be of type pkcs12 |
| -deststorepass changeit | This is the destination file password, here its “changeit” |
The source and destination passwords may/may not be same.
Step3 – Create .jks file from the merged .p12 file
keytool -importkeystore -deststorepass changeit -destkeypass changeit -destkeystore techCurdsTrusted.jks -srckeystore techCurds_cust2.p12 -srcstoretype PKCS12 -srcstorepass changeit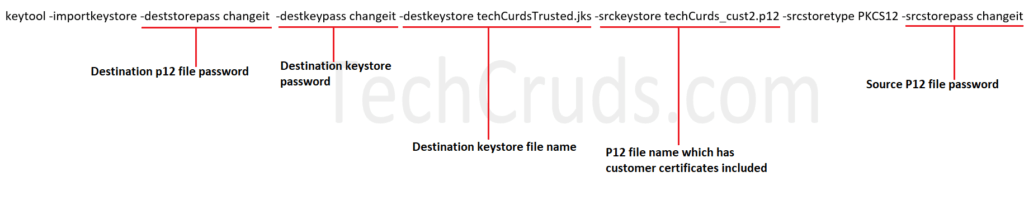
Importing Apple Certificates
Important points:
- Check if key is encrypted or not
- Don’t add alias while creating P12 file
- While decrypting key put password shared by customer
- While creating P12 and keystore you can put your custom password
If the certificate is from customers and it has key whose starting line is as “—–BEGIN ENCRYPTED PRIVATE KEY—–” so this means you will need to decrypt this key before following the steps of installation.
- Decrypt the key using below command in linux (ONLY if the key is encrypted ):
openssl rsa -in techCruds_customr_encrypted_key.pkcs8.pem -out techCruds_customer_decrypted_key.pkcs8.key
2. Create a P12 file using the certificate, key and chain file using below command:
openssl pkcs12 -export -in techCruds_customer.cert.pem -inkey techCruds_customer_decrypted_key.pkcs8.key -certfile techCruds_customer_domain.chain.pem -out techCruds_customer_domain.p12It will ask for below password:
Enter Export Password:
Verifying Export Password:
These will be passwords which you can set for this p12 file
3. Create an apple keystore using below command:
keytool -importkeystore -srckeystore techCruds_customer_domain.p12 -srcstoretype PKCS12 -destkeystore customerAppleTrusted.jks -deststoretype jksAfter you run above command it will display below statements:
Importing techCruds_customer_domain.p12 to customerAppleTrusted.jks . . .
Enter destination keystore password: New password for .jks file
Re-enter new password: New password for .jks file
Enter source keystore password: Password of .p12 file
Entry for alias 1 successfully imported.
NOTE: To eliminate the confusion, we suggest having same password for both p12 and jks file, so that in step 3 you will need to put same password all 3 times.
Other related Articles:
Top 15 Useful Keytool commands